
Pest Control App Account Setup Guide
10 Steps to get your Formitize Pest Control Account Setup
We have worked with thousands of Pest Controllers just like you.
These Pesties have told us that the key challenges that most Pest Control businesses face include:
- Editing and formatting Reports take too long and use too much paper.
- Disorganised scheduling and lack of reminders and communication with the client.
- Double handling of information and the time lost/wasted every day
Your check list
10 items you can tick off your list to help get your Formitize account up and running
1. Company Settings
The set-up of your Company Details is the first step in the process.
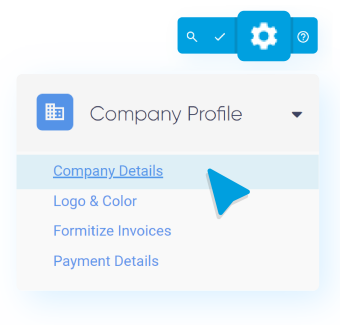
You can find all of your account settings by clicking on the Settings Cog in the top right-hand corner of your Formitize Web Portal (see image below).
Once you have selected the Settings Cog, click on the Company Profile tab. This will open four new options for you to select from.
Click on Company Details. From this page, you can add details such as your Company Business Number, Full Address, and other forms of Contact Details.
Make sure you Save after making any changes.
You can also now go back to the Company Profile tab and select Logo & Colour. From this page, you can add your company logo to your account, as well as choose the main theme colour you will see throughout the Formitize Web Portal, App, and all of your Formitize Specialist Pest & Termite Reports.

2. Invoice Settings
Invoice Settings can once again be accessed by clicking on the Settings Cog in the top right hand corner of your Formitize Web Portal.
This time, click on the Accounts tab, and select Invoices.
From this page you will be able to create your Invoice Payment Terms & Conditions, Invoice Defaults and PDF Options, Payment Terms, and even set up automated Outstanding Invoice Reminders, so you can leave the chasing of your Invoices up to us.
3. Quote Settings
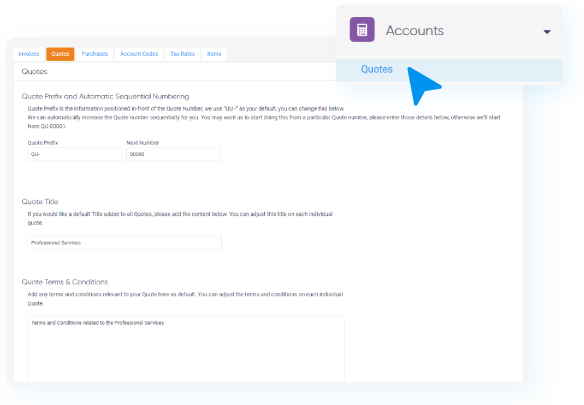
Quote Settings can be found by clicking on the Settings Cog, select Accounts, and then select Quotes.
From this page you will be able to create your Quote Terms & Conditions, Quote Expiry Periods, Quote PDF Options, and set up automated Quote Reminders. With Formitize, you have a fully equipped admin team working with you 24/7.
4. Accounting Software Integration
Now it is time to Integrate your Accounting Software with your Formitize account.
At this stage, we have full two-way integrations with Xero and Quickbooks, with other Accounting Software integrations on the way.
Integrating your Accounting Software with Formitize will save you from all the double handling of Contact details, Quoting and Invoicing.
If you complete an Invoice in Formitize, it will push straight to your Accounting Software, updating automatically every 15 seconds. These seamless Integrations are a huge time saver for you and your business.
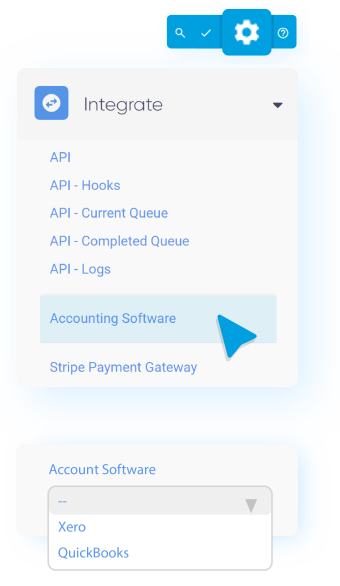
To Integrate your Accounting Software, you can click on the Settings Cog once again, select the Integrate tab, and then click on Accounting Software. Click on the Dropdown box shown in the image below:
Select the relevant Accounting Software from the list, and this will redirect you to your Accounting Software’s Login page. Enter your details, and then you can sit back and relax as all of your Contacts, Invoices, and Quotes seamlessly push between the two software applications.
Can’t see all of your information straight away? Don’t worry! This can take a few minutes to sync.
5. Users and User Groups
A Formitize User is classified as anyone in your Pest Control business that will need access to your Formitize Account, whether they are Admin or Office Staff, or Technicians out in the Field.
New User
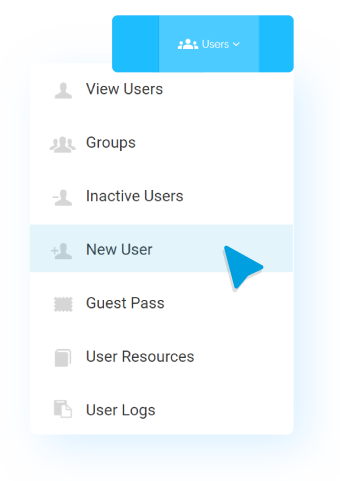
Everyone in your business can be added to your Formitize Account as User by selecting Users in the menu running across the top of your Formitize Web Portal, and then click on New User.
From this page you can add in the Users details, and select what type of User this person is (Field Agent, Admin, Portal User). You can also create unique login details for each of your Users from this page.
Once this User is created, you will be redirected to their User Profile, where you can adjust the permissions of your Users, limiting what they are able to see in the Formitize Account.

User Groups
User Groups can also be created to categorise your Users into teams. These User Groups may consist of General Pest Technicians, Timber Pest Technicians, Admin team etc. You can assign specific permissions to specific User Groups too! You can create User Groups by selecting Users in the menu running across the top of your Formitize Web Portal, and then click on Groups.
6. Creating a Contact in your CRM
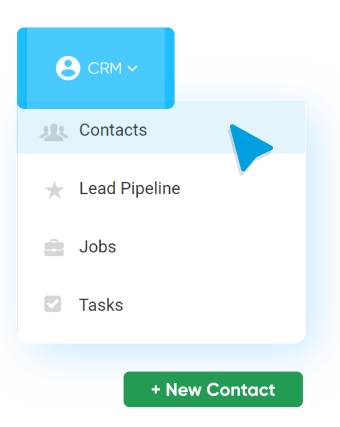
Creating a Contact in your CRM is really easy, and can be done by selecting CRM in the menu running across the top of your Formitize Web Portal, and then clicking on Contacts.
From this page you can see a list view of all of the Contacts stored in your Formitize Account.
In the top right-hand corner of this page, you will see a Green New Contact button. Fill out the Contact’s Details, Save when you are finished, and that contact will save in the list for you to view at any time, or select from when filling out a Form/Creating a Job. Add as much detail as possible, because this will save you time later down the track.
7. Editing Formitize Specialist Reports
One great feature of our Formitize Specialist Reports is that they are fully customisable to suit your needs.
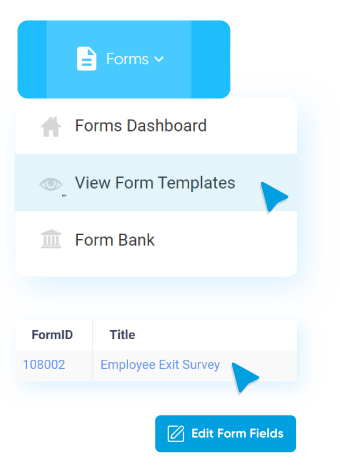
Making changes to Forms is really simple, and can be done by selecting Forms in the menu running across the top of your Formitize Web Portal, and then clicking on View Form Templates.
From this page you will be able to see all of the Form Templates that are in your account.
Click on the name of the Form Template that you are wanting to edit, and scroll to the bottom of the Form Details page to the Blue Edit Form Fields button.
Click on this button, and it will direct you straight into the Form Builder.
8. Reviewing Job Type Templates
Job Types is a really cool feature that makes creating Jobs so much easier! A Job Type can be created for each different type of service you would provide for a client.
We have already created these for you, but you can always add your own, or even edit the ones that we have already created.
To access your Job Type Templates, select Jobs in the menu running across the top of your Formitize Web Portal, and then click on Job Type Templates.
From this page you will see the list of Job Types that we have created for you. Click on one of these templates to view the contents.
On the first Job Details page, you can give the Job Type a title, brief description, and even attach any forms to this type of Service.
Next, look at Job Status Updates and Future Reminders. These tabs contain all of the automated communications that can be sent out before or after each job that you do. You can easily edit any of the text in the communication, or disable the communication so that your clients won’t receive the message.
The Formitize Automated Assistants are just like having a whole new team behind you taking care of so many of the general day-to-day tasks so that you can focus on driving the business forward (and it all automatically scales as you do). Your clients will love it!
9. Resources (Document Management)
Get rid of all that paper lying around the Office, and put a halt to the technicians carrying around chunky paper folders in their vehicles.
Use Formitize Resources to organize all of this paper into clear, digital folders where nothing will ever get lost, and everything is easily accessible.
There are a whole bunch of Resources in your account that are ready to use, and you can always add your own. Resources can range from Company Manuals, Chemical lists, to Safety Data Sheets, to Insurance documents to fact files about pests and pest products.
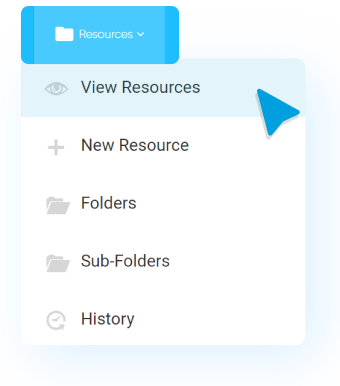
View all of your Resources by selecting Resources in the menu running across the top of your Formitize Web Portal, and then click on View Resources.
You can add new Resources by selecting Resources once again, and clicking on New Resource.

10. Activate your Formitize account!
All that’s left to do is to activate your Formitize account!
This can be done by clicking on the Settings Cog in the top right hand corner of your Formitize Web Portal, and then select Company Profile, and Payment Details.
Add your Payment details and you are all ready to go. One of our Formitize CSM’s would be more than happy to assist you with this step, so feel free to give us a call or send through an email.
You will still receive the rest of the Free Trial Period free, and the first monthly payment will be taken from the account when the 14 day trial expires.
Enjoy unlimited access to your all-in-one business solution, with no lock-in contract!
*Our Professional Services team would love to run a training session with you. Whether this is focused on configuration, or assisting with your specific business needs.
Our training sessions are charged at just $150 + GST per hour and help you get off to a flying start. If you are interested, simply Book Training here
Getting Started FAQ's
1. Getting Started
3. Configure & Personalise
2. Getting Support
4. Automated Customer Communications

Need further assistance?
Never fear, we are here to help!
The Formitize Team is ready to help you solve the challenges that you face everyday to make your life easier so that you can streamline your processes, work smarter and start growing your Pest Control Business with everything in one place.
Book in for a training session* with our Professional Services team. They will help you get off on the right foot!